Project Layout
In practice, a solid project setup should be more than just throwing code files at random place into a contrived project structure.
Problem Statement
Unfortunately I've experienced that in many student projects it comes down to exactly this: A chaotic project layout that has grown over time and no one wants to tamper with. To start a project you need to first click your way through IDE specific menus, then hopefully click on a green triangle start button and cross you fingers that the project will magically work.
For little scripting codebases hammered out in a day this might work - but larger software projects often showcase a list of dependencies, and the barrier for new developers to set up their IDE should be as low as possible. You want a mechanism that allows you to compile and run your code reliably, no matter to platform or developer cloning the project - without tedious project configurations on every new clone.
Maven's Contribution
This is where maven enters the game. Maven replaces the click based IDE project configuration (where a developer sets up their project requirements and plugins via IDE menus), by just one central xml textual description: the pom.xml.
Crafting a good pom.xml takes some effort - but the good news is: once the pom.xml is set up, no one ever needs to touch a UI menu again. Libraries and coding conventions are no longer stored in the project, but referenced form a central repository. This keeps your repo slim and allows every client to reliably pull all dependencies at compile time.
Files and Folders
The root of a maven project should roughly look like this:
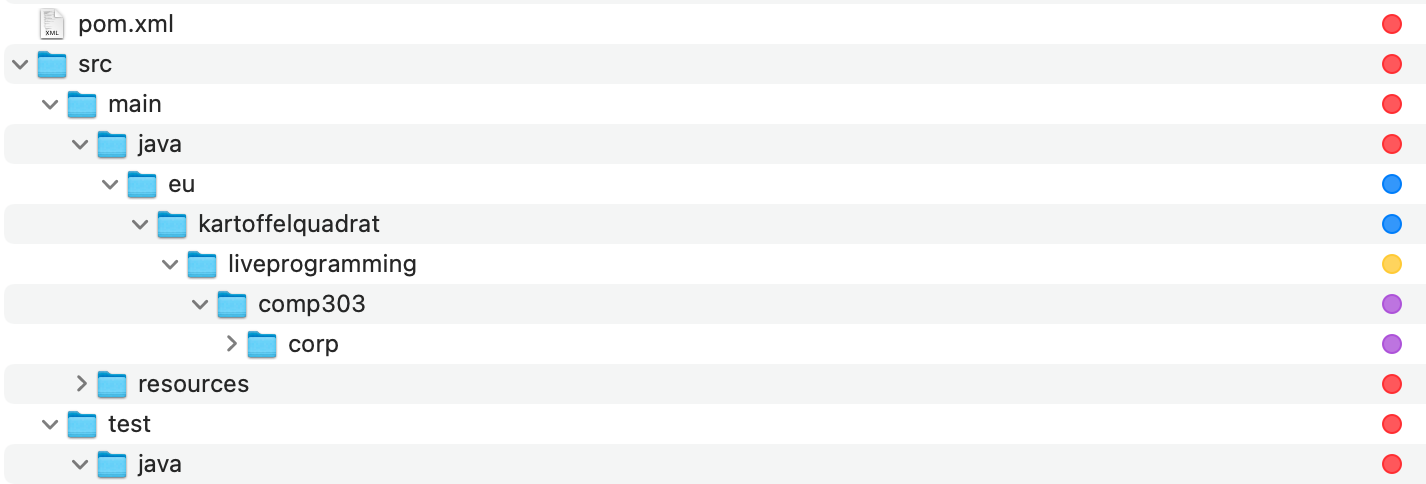
Sample project structure is a modified selection of the COMP303 Starter code.
Before we go into the details, note that there are two important entities at root level:
pom.xmlwhich contains all project configuration. Almost everything presented over the next pages are snippets that extend this file.- A
srcfolder for all your source code, tests and resources.
Depending on which configurations you add to your pom.xml, you might have additional content on top level. But for a start these two are the minimum compile requirements for your project at root level.
SRC Layout
Next let's look at the nested content of the src folder. Everything that carries a red marker in the capture above must be in place exactly as shown. If you alter that structure, your project simply is not valid and there are zero guarantees for what happens when you attempt to run it.
Conventions:
- Your java sources goes into subfolders of
src/main/java - Your java tests go into subfolders of
src/test/java - Your resource files go into
src/main/resources
GroupId, ArtifactId, Packages
In the test/java and src/java folder you see subfolders: eu/kartoffelquadrat/liveprogramming/comp303/corp.
eu/kartoffelquadrathas a blue label. This on represents yourgroupId. ThegroupIdis specific to the developer or code maintainer responsible for the project. By convention it is the inverted domain name of your affiliation. So for instance if you are a student at McGill you could use:ca/mcgillinstead ofeu/kartoffelquadrat. It can also be longer than two segments, but it seems to have become an unwritten convention to use two segments.Do not use
eu/kartoffelquadratfor your projects. If in doubt, you can always usegithub.yourgithubname.liveprogrammingis theartifactId. It has a yellow label. It describes the specific purpose of your project. For instance if you are developing a board game tic tac toe client, it could beticTacToeClient.- Optionally you can create further subfolders for sub-packages (purple label). E.g. if you have an MVC structure you can place parallel folders for
model,view,controlunder yourartifactId. Packages are optional for smaller projects, but for everything that has more than 5 classes, I'd recommend extra packages, just to keep things somewhat modular.